Page 46 - Microsoft Word - 4236
P. 46
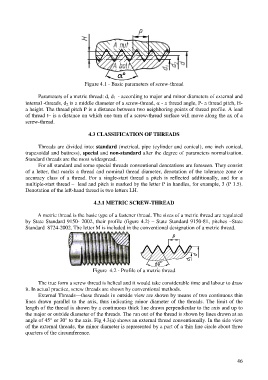
Figure 4.1 - Basic parameters of screw-thread
Parameters of a metric thread: d, d 1 - according to major and minor diameters of external and
internal -threads, d 2 is a middle diameter of a screw-thread, - a thread angle, Р- a thread pitch, Н-
a height. The thread pitch Р is a distance between two neighboring points of thread profile. A lead
of thread t– is a distance on which one turn of a screw-thread surface will move along the ax of a
screw-thread.
4.3 CLASSIFICATION OF THREADS
Threads are divided into: standard (metrical, pipe (cylinder and conical), one inch conical,
trapezoidal and buttress), special and non-standard after the degree of parameters normalization.
Standard threads are the most widespread.
For all standard and some special threads conventional denotations are foreseen. They consist
of a letter, that marks a thread and nominal thread diameter, denotation of the tolerance zone or
accuracy class of a thread. For a single-start thread a pitch is reflected additionally, and for a
multiple-start thread – lead and pitch is marked by the letter Р in handles, for example, 3 (Р 1.5).
Denotation of the left-hand thread is two letters LH.
4.3.1 METRIC SCREW-THREAD
A metric thread is the basic type of a fastener thread. The sizes of a metric thread are regulated
by State Standard 9150- 2002, their profile (figure 4.2) – State Standard 9150-81, pitches –State
Standard 8724-2002. The letter M is included in the conventional designation of a metric thread.
Figure 4.2 - Profile of a metric thread
The true form a screw thread is helical and it would take considerable time and labour to draw
it. In actual practice, screw threads are shown by conventional methods.
External Threads—these threads in outside view are shown by means of two continuous thin
lines drawn parallel to the axis, thus indicating minor diameter of the threads. The limit of the
length of the thread is shown by a continuous thick line drawn perpendicular to the axis and up to
the major or outside diameter of the threads. The run out of the thread is shown by lines drawn at an
angle of 45° or 30° to the axis. Fig 4.3(a) shows an external thread conventionally. In the side view
of the external threads, the minor diameter is represented by a part of a thin line circle about three
quarters of the circumference.
46

