Page 47 - Microsoft Word - 4236
P. 47
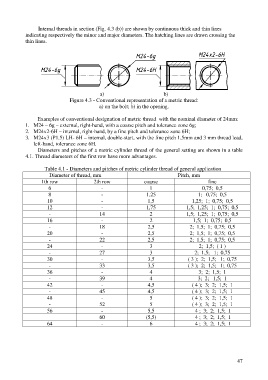
Internal threads in section (Fig. 4.3 (b)) are shown by continuous thick and thin lines
            indicating respectively the minor and major diameters. The hatching lines are drawn crossing the
            thin lines.


                                             а)                           b)
                                Figure 4.3 - Conventional representation of a metric thread:
                                             a) on the bolt; b) in the opening.

                  Examples of conventional designation of metric thread with the nominal diameter of 24mm:
            1. M24 – 6g – external, right-hand, with a coarse pitch and tolerance zone 6g;
            2. M24x2-6H – internal, right-hand, by a fine pitch and tolerance zone 6H;
            3. M24x3 (P1.5) LH- 6H – internal, double-start, with the fine pitch 1,5mm and 3 mm thread lead,
                left-hand, tolerance zone 6H.
                  Diameters and pitches of a metric cylinder thread of the general setting are shown in a table
            4.1. Thread diameters of the first row have more advantages.


                     Table 4.1 - Diameters and pitches of metric cylinder thread of general application
                       Diameter of thread, mm                                   Pitch, mm
                   1th row                 2th row               coarse                      fine
                       6                      -                    1                       0,75; 0,5
                       8                      -                   1,25                   1; 0,75; 0,5
                      10                      -                    1,5                1,25; 1; 0,75; 0,5
                      12                      -                   1,75              1,5; 1,25; 1; 0,75; 0,5
                       -                     14                    2                1,5; 1,25; 1; 0,75; 0,5
                      16                      -                    2                   1,5; 1; 0,75; 0,5
                       -                     18                    2,5               2; 1,5; 1; 0,75; 0,5
                      20                      -                    2,5               2; 1,5; 1; 0,75; 0,5
                       -                     22                    2,5               2; 1,5; 1; 0,75; 0,5
                      24                      -                    3                     2; 1,5; ( 1 )
                       -                     27                    3                   2; 1,5; 1; 0,75
                      30                      -                    3,5              ( 3 ); 2; 1,5; 1; 0,75
                       -                     33                    3,5              ( 3 ); 2; 1,5; 1; 0,75
                      36                      -                    4                     3; 2; 1,5; 1
                       -                     39                    4                     3; 2; 1,5; 1
                      42                      -                    4,5                ( 4 ); 3; 2; 1,5; 1
                       -                     45                    4,5                ( 4 ); 3; 2; 1,5; 1
                      48                      -                    5                  ( 4 ); 3; 2; 1,5; 1
                       -                     52                    5                  ( 4 ); 3; 2; 1,5; 1
                      56                      -                    5,5                  4 ; 3; 2; 1,5; 1
                                             60                   (5,5)                 4 ; 3; 2; 1,5; 1
                      64                      -                    6                    4 ; 3; 2; 1,5; 1


                                                                                                          47

