Page 41 - Microsoft Word - 4236
P. 41
а) b) c)
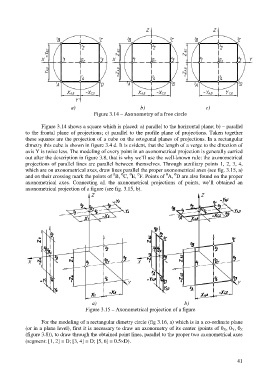
Figure 3.14 – Axonometry of a free circle
Figure 3.14 shows a square which is placed: a) parallel to the horizontal plane; b) – parallel
to the frontal plane of projections; c) parallel to the profile plane of projections. Taken together
these squares are the projection of a cube on the ortogonal planes of projections. In a rectangular
dimetry this cube is shown in figure 3.4 d. It is evident, that the length of a verge to the direction of
axis Y is twice less. The modeling of every point in an axonometrical projection is generally carried
out after the description in figure 3.8, that is why we’ll use the well-known rule: the axonometrical
projections of parallel lines are parallel between themselves. Through auxiliary points 1, 2, 3, 4,
which are on axonometrical axes, draw lines parallel the proper axonometrical axes (see fig. 3.15, a)
0
0
0
0
0
0
and on their crossing mark the points of B, C, E, F. Points of A, D are also found on the proper
axonometrical axes. Connecting all the axonometrical projections of points, we’ll obtained an
axonometrical projection of a figure (see fig. 3.15, b).
а) b)
Figure 3.15 – Axonometrical projection of a figure
For the modeling of a rectangular dimetry circle (fig 3.16, a) which is in a co-ordinate plane
(or in a plane level), first it is necessary to draw an axonometry of its center (points of 0 X, 0 Y, 0 Z
(figure 3.8)), to draw through the obtained point lines, parallel to the proper two axonometrical axes
(segment: [1, 2] = D; [3, 4] = D; [5, 6] = 0.5D).
41

