Page 34 - 4234
P. 34
Both planes are profile-projecting
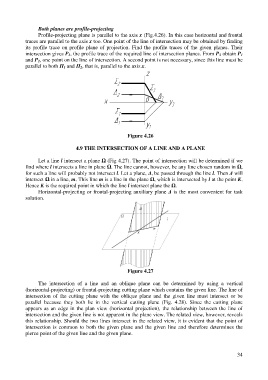
                  Profile-projecting plane is parallel to the axis x (Fig.4.26). In this case horizontal and frontal
            traces are parallel to the axis x too. One point of the line of intersection may be obtained by finding
            its profile trace on profile plane of projection. Find the profile traces of the given planes. Their

            intersection gives P 3, the profile trace of the required line of intersection planes. From P 3 obtain P 1
            and P 2, one point on the line of intersection. A second point is not necessary, since this line must be
            parallel to both П 1 and П 2, that is, parallel to the axis x.


                                                          Figure 4.26

                                   4.9 THE INTERSECTION OF A LINE AND A PLANE


                  Let a line l intersect a plane Ω (Fig 4.27). The point of intersection will be determined if we
            find where l intersects a line in plane Ω. The line cannot, however, be any line chosen random in Ω,
            for such a line will probably not intersect l. Let a plane, Δ, be passed through the line l. Then Δ will
            intersect Ω in a line, m. This line m is a line in the plane Ω, which is intersected by l at the point K.
            Hence K is the required point in which the line l intersect plane the Ω.
                  Horizontal-projecting or frontal-projecting auxiliary plane Δ is the most convenient for task
            solution.


                                                          Figure 4.27


                  The intersection of a line and an oblique plane can be determined by using a vertical
            (horizontal-projecting) or frontal-projecting cutting plane which contains the given line. The line of
            intersection of the cutting plane with the oblique plane and the given line must intersect or be
            parallel because they both lie in the vertical cutting plane (Fig. 4.28). Since the cutting plane
            appears as an edge in the plan view (horizontal projection), the relationship between the line of
            intersection and the given line is not apparent in the plane view. The related view, however, reveals
            this relationship. Should the two lines intersect in the related view, it is evident that the point of
            intersection is common to both the given plane and the given line and therefore determines the
            pierce point of the given line and the given plane.


                                                                                                          34

