Page 59 - Microsoft Word - 4236
P. 59
4.5.3 SCREW JOINT

                  The thickness of an overhead joining part and parameters of a screw are input data for the
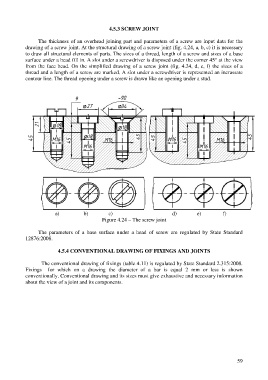
            drawing of a screw joint. At the structural drawing of a screw joint (fig. 4.24, а, b, c) it is necessary
            to draw all structural elements of parts. The sizes of a thread, length of a screw and sizes of a base
            surface under a head fill in. A slot under a screwdriver is disposed under the corner 45° at the view
            from the face head. On the simplified drawing of a screw joint (fig. 4.24, d, e, f) the sizes of a
            thread and a length of a screw are marked. A slot under a screwdriver is represented an incrassate
            contour line. The thread opening under a screw is drawn like an opening under a stud.


                          а)          b)         c)                          d)         e)          f)
                                              Figure 4.24 – The screw joint


                  The parameters of a base surface under a head of screw are regulated by State Standard
            12876:2008.


                           4.5.4 CONVENTIONAL DRAWING OF FIXINGS AND JOINTS

                   The conventional drawing of fixings (table 4.11) is regulated by State Standard 2.315:2008.
            Fixings   for which on a drawing the diameter of a bar is equal 2 mm or less is shown
            conventionally. Conventional drawing and its sizes must give exhaustive and necessary information
            about the view of a joint and its components.


                                                                                                          59

