Page 24 - Microsoft Word - 4236
P. 24
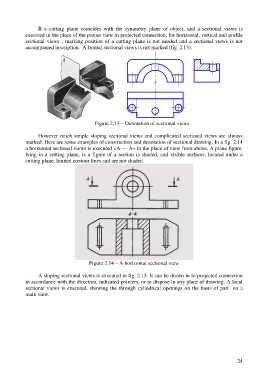
If a cutting plane coincides with the symmetry plane of object, and a sectional views is
            executed in the place of the proper view in projected connection, for horizontal, vertical and profile
            sectional views , marking position of a cutting plane is not needed and a sectional views is not
            accompanied inscription. A frontal sectional views is not marked (fig. 2.13).


                                           Figure 2.13 – Denotation of sectional views


                  However much simple sloping sectional views and complicated sectional views are always
            marked. Here are some examples of construction and denotation of sectional drawing. In a fig. 2.14
            a horizontal sectional views is executed «A — A» in the place of view from above. A plane figure,
            lying in a cutting plane, is a figure of a section is shaded, and visible surfaces, located under a
            cutting plane, limited contour lines and are not shaded.


                                         Figure 2.14 – A horizontal sectional view


                  A sloping sectional views is executed in fig. 2.15. It can be drawn in to projected connection
            in accordance with the direction, indicated pointers, or to dispose in any place of drawing. A local
            sectional views is executed, showing the through cylindrical openings on the basis of part on a
            main view.


                                                                                                          24

