Page 19 - Microsoft Word - 4236
P. 19
4 – right-side view;
                  5 – bottom view;
                  6 – rear view.
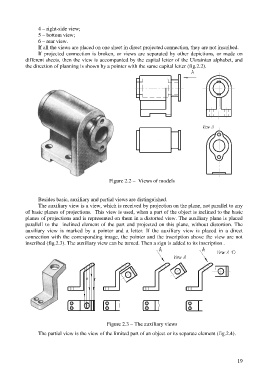
                  If all the views are placed on one sheet in direct projected connection, they are not inscribed.
                  If projected connection is broken, or views are separated by other depictions, or made on
            different sheets, then the view is accompanied by the capital letter of the Ukrainian alphabet, and
            the direction of planning is shown by a pointer with the same capital letter (fig.2.2).


                                                 Figure 2.2 – Views of models


                  Besides basic, auxiliary and partial views are distinguished.
                  The auxiliary view is a view, which is received by projection on the plane, not parallel to any
            of basic planes of projections. This view is used, when a part of the object is inclined to the basic
            planes of projections and is represented on them in a distorted view. The auxiliary plane is placed
            parallell to the inclined element of the part and projected on this plane, without distortion. The
            auxiliary view is marked by a pointer and a letter. If the auxiliary view is placed in а direct
            connection with the corresponding image, the pointer and the inscription above the view are not
            inscribed (fig.2.3). The auxiliary view can be turned. Then a sign is added to its inscription .


                                                Figure 2.3 – The auxiliary views

                  The partial view is the view of the limited part of an object or its separate element (fig.2.4).


                                                                                                          19

