Page 12 - 4894
P. 12
Weld verification


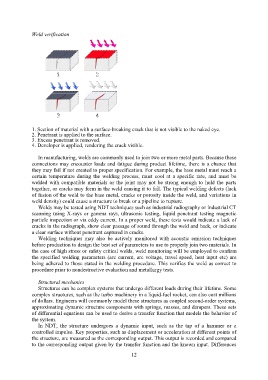
               1. Section of material with a surface-breaking crack that is not visible to the naked eye.
               2. Penetrant is applied to the surface.
               3. Excess penetrant is removed.
               4. Developer is applied, rendering the crack visible.

                  In manufacturing, welds are commonly used to join two or more metal parts. Because these
               connections may encounter loads and fatigue during product lifetime, there is a chance that
               they may fail if not created to proper specification. For example, the base metal must reach a
               certain  temperature  during  the  welding  process,  must  cool  at  a  specific  rate,  and  must  be
               welded  with  compatible  materials or the  joint  may  not be strong enough to hold the parts
               together, or cracks may form in the weld causing it to fail. The typical welding defects (lack
               of fusion of the weld to the base metal, cracks or porosity inside the weld, and variations in
               weld density) could cause a structure to break or a pipeline to rupture.
                  Welds may be tested using NDT techniques such as industrial radiography or industrial CT
               scanning using X-rays or  gamma rays,  ultrasonic testing,  liquid penetrant testing  magnetic
               particle inspection or via eddy current. In a proper weld, these tests would indicate a lack of
               cracks in the radiograph, show clear passage of sound through the weld and back, or indicate
               a clear surface without penetrant captured in cracks.
                  Welding  techniques  may  also  be  actively  monitored  with  acoustic  emission  techniques
               before production to design the best set of parameters to use to properly join two materials. In
               the case of high stress or safety critical welds, weld monitoring will be employed to confirm
               the specified welding parameters (arc current, arc voltage, travel speed, heat input etc) are
               being adhered to those stated in the welding procedure. This verifies the weld as correct to
               procedure prior to nondestructive evaluation and metallurgy tests.

                  Structural mechanics
                  Structures can be complex systems that undergo different loads during their lifetime. Some
               complex structures, such as the turbo machinery in a liquid-fuel rocket, can also cost millions
               of dollars. Engineers will commonly model these structures as coupled second-order systems,
               approximating dynamic structure components with springs, masses, and dampers. These sets
               of differential equations can be used to derive a transfer function that models the behavior of
               the system.
                  In  NDT,  the  structure  undergoes  a  dynamic  input,  such  as  the  tap  of  a  hammer  or  a
               controlled impulse. Key properties, such as displacement or acceleration at different points of
               the structure, are measured as the corresponding output. This output is recorded and compared
               to the corresponding output given by the transfer function and the known input. Differences

                                                           12

