Page 12 - Microsoft Word - 4236
P. 12
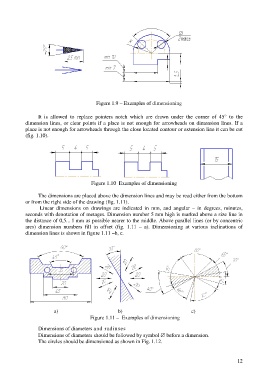
Figure 1.9 – Examples of dimensioning
It is allowed to replace pointers notch which are drawn under the corner of 45° to the
dimension lines, or clear points if a place is not enough for arrowheads on dimension lines. If a
place is not enough for arrowheads through the close located contour or extension line it can be cut
(fig. 1.10).
Figure 1.10 Examples of dimensioning
The dimensions are placed above the dimension lines and may be read either from the bottom
or from the right side of the drawing (fig. 1.11).
Linear dimensions on drawings are indicated in mm, and angular – in degrees, minutes,
seconds with denotation of metages. Dimension number 5 mm high is marked above a size line in
the distance of 0,5... 1 mm as possible nearer to the middle. Above parallel lines (or by concentric
arcs) dimension numbers fill in offset (fig. 1.11 – a). Dimensioning at various inclinations of
dimension lines is shown in figure 1.11 –b, c.
а) b) c)
Figure 1.11 – Examples of dimensioning
Dimensions of diameters and radiuses
Dimensions of diameters should be followed by symbol before a dimension.
The circles should be dimensioned as shown in Fig. 1.12.
12

