Page 11 - Microsoft Word - 4236
P. 11
It is nesessaty to take the corner of 30°or 60° instead of 45° if the lines of shading coincide
            with the direction of the lines of contour. Narrow areas of cuts with a width less than 2 mm, allow
            to show blacken (figure 1.7).


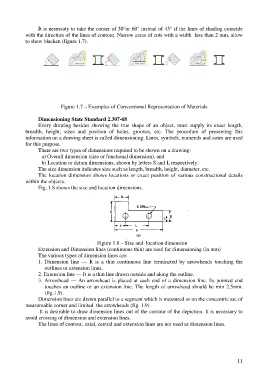
                            Figure 1.7 – Examples of Conventional Representation of Materials

                  Dimensioning State Standard 2.307-68
                  Every drawing besides showing the true shape of an object, must supply its exact length,
            breadth, height, sizes and position of holes, grooves, etc. The procedure of presenting this
            information on a drawing sheet is called dimensioning. Lines, symbols, numerals and notes are used
            for this purpose.
                  There are two types of dimensions required to be shown on a drawing:
                    a) Overall dimension (size or functional dimension), and
                    b) Location or datum dimensions, shown by letters S and L respectively.
                  The size dimension indicates size such as length, breadth, height, diameter, etc.
                  The location dimension shows locations or exact position of various constructional details
            within the objects.
                  Fig. 1.8 shows the size and location dimensions.


                                            Figure 1.8 – Size and location dimension
                  Extension and Dimension lines (continuous thin) are used for dimensioning (in mm)
                  The various types of dimension lines are:
                  1. Dimension line — It is a thin continuous line terminated by arrowheads touching the
                     outlines or extension lines.
                  2. Extension line — It is a thin line drawn outside and along the outline.
                  3. Arrowhead — An arrowhead is placed at each end of a dimension line. Its pointed end
                     touches an outline or an extension line. The length of arrowhead should be min 2.5mm.
                     (fig.1.9).
                  Dimension lines are drawn parallel to a segment which is measured or on the concentric arc of
            measureable corner and limited the arrowheads (fig. 1.9).
                   It is desirable to draw dimension lines out of the contour of the depiction. It is necessary to
            avoid crossing of dimension and extension lines.
                  The lines of contour, axial, central and extension lines are not used as dimension lines.


                                                                                                          11

