Page 20 - 4234
P. 20
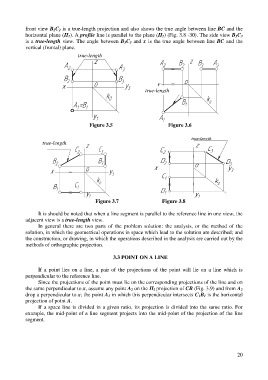
front view B 2C 2 is a true-length projection and also shows the true angle between line BC and the

            horizontal plane (Π 1). A profile line is parallel to the plane (Π 2) (Fig. 3.8 -30). The side view B 3C 3
            is a true-length view. The angle between B 3C 3 and x is the true angle between line BC and the
            vertical (frontal) plane.
                                    true-length


                                                                 true-length


                                         Figure 3.5                         Figure 3.6


                                                                                      true-length
                    true-length                                                       величина


                                           Figure 3.7                    Figure 3.8

                  It is should be noted that when a line segment is parallel to the reference line in one view, the
            adjacent view is a true-length view.
                  In general there are two parts of the problem solution: the analysis, or the method of the
            solution, in which the geometrical operations in space which lead to the solution are described; and
            the construction, or drawing, in which the operations described in the analysis are carried out by the
            methods of orthographic projection.

                                                   3.3 POINT ON A LINE


                  If a point lies on a line, a pair of the projections of the point will lie on a line which is
            perpendicular to the reference line.
                  Since the projections of the point must lie on the corresponding projections of the line and on

            the same perpendicular to x, assume any point A 2 on the Π 2 projection of CB (Fig. 3.9) and from A 2
            drop a perpendicular to x; the point A 1 in which this perpendicular intersects C 1B 1 is the horizontal
            projection of point A.
                  If a space line is divided in a given ratio, its projection is divided into the same ratio. For
            example, the mid-point of a line segment projects into the mid-point of the projection of the line
            segment.


                                                                                                          20

