Page 71 - Microsoft Word - 4236
P. 71
a b
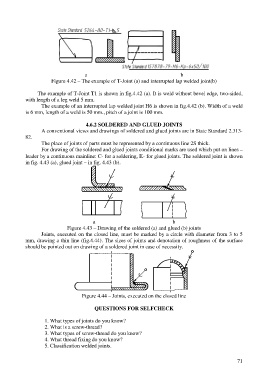
Figure 4.42 – The example of T-Joint (a) and interrupted lap welded joint(b)
The example of T-Joint T1 is shown in fig.4.42 (a). It is weld without bevel edge, two-sided,
with length of a leg weld 5 mm.
The example of an interrupted lap welded joint H6 is shown in fig.4.42 (b). Width of a weld
is 6 mm, length of a weld is 50 mm., pitch of a joint is 100 mm.
4.6.2 SOLDERED AND GLUED JOINTS
A conventional views and drawings of soldered and glued joints are in State Standard 2.313-
82.
The place of joints of parts must be represented by a continuous line 2S thick.
For drawing of the soldered and glued joints conditional marks are used which put on lines –
leader by a continuous mainline: C- for a soldering, - for glued joints. The soldered joint is shown
in fig. 4.43 (a), glued joint – in fig. 4.43 (b).
a b
Figure 4.43 – Drawing of the soldered (a) and glued (b) joints
Joints, executed on the closed line, must be marked by a circle with diameter from 3 to 5
mm, drawing a thin line (fig.4.44). The sizes of joints and denotation of roughness of the surface
should be pointed out on drawing of a soldered joint in case of necessity.
Figure 4.44 – Joints, executed on the closed line
QUESTIONS FOR SELFCHECK
1. What types of joints do you know?
2. What is a screw-thread?
3. What types of screw-thread do you know?
4. What thread fixing do you know?
5. Classification welded joints.
71

