Page 65 - Microsoft Word - 4236
P. 65
Table 4.17
            Nominal          Thread      L,      l ,      D 1,     D 2,      b,    R 1,      R 2,      S,
            bore, Dy,        G, inch    mm      mm       mm        mm       mm     mm        mm       mm
            mm
                  10           3/8       25     10.0      24        22      2.0       4      6.5       2.5
                  15           1/2       28     12.0     28.6      26.6     2.0      2.7     5.5       2.8
                  20           3/4       33     13.5     34.9      32.4     2.5      3.3     6.3       3.0
                  25            1        38     15.0     42.1      39.6     2.5      3.2     6.5       3.3
                  32            1        45     17.0      52        49      3.0      3.4      7        3.6
                  40            1        50     19.0      59        56      3.0       3       7        4.0
                  50            2        58     21.0     70.5       67      3.5      2.5      7        4.5

                   The example of the conventional denotation of a tee with the nominal bore 20 mm: Tee 20
            State Standard 8948-75.


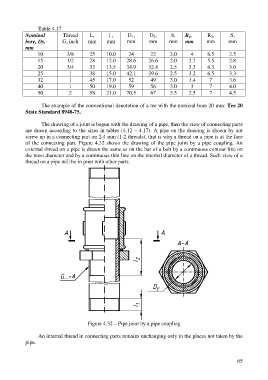
                   The drawing of a joint is begun with the drawing of a pipe, then the view of connecting parts
            are drawn according to the sizes in tables (4.12 – 4.17). A pipe on the drawing is shown by not
            screw up in a connecting part on 2-4 mm (1-2 threads), that is why a thread on a pipe is at the face
            of the connecting part. Figure 4.32 shows the drawing of the pipe joint by a pipe coupling. An
            external thread on a pipe is drawn the same as on the bar of a bolt by a continuous contour line on
            the most diameter and by a continuous thin line on the internal diameter of a thread. Such view of a
            thread on a pipe will be in joint with other parts.


                                        Figure 4.32 – Pipe joint by a pipe coupling

                  An internal thread in connecting parts remains unchanging only in the places not taken by the
            pipe.


                                                                                                          65

