Page 78 - Microsoft Word - 4236
P. 78
6.3 DENOTATION OF ROUGHNESS OF SURFACES
The roughness of surfaces of the parts is marked on sketches and detail drawing s by
conventional signs.
The roughness of surface is the aggregate of inequalities in the form of profile peak and
profile valley which remain on the surface of the part as a result of the influence of a cutting
instrument. For setting norms and evaluation of roughness of surface State Standard 2789-73 set six
parameters among which the parameters of Ra are mainly used in practice (arithmetical mean
deviation of the profile) and Rz – ten-point height of irregularities.
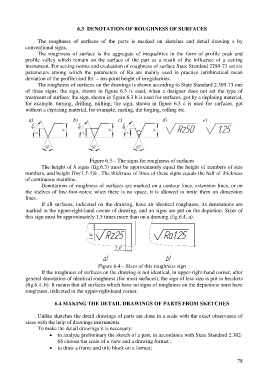
The roughness of surfaces on the drawings is shown according to State Standard 2.309-73 one
of three signs: the sign, shown in figure 6.3 is used, when a designer does not set the type of
treatment of surface; the sign, shown in figure 6.3 b is used for surfaces, got by a deplating material,
for example, turning, drilling, milling; the sign, shown in figure 6.3 c is used for surfaces, got
without a deplating material, for example, casting, die forging, rolling etc.
а) b) c) d) e)
Figure 6.3 – The signs for roughness of surfaces
The height of h signs (fig.6.3) must be approximately equal the height of numbers of size
numbers, and height H=(1,5-3)h . The thickness of lines of these signs equals the half of thickness
of continuous mainline.
Denotations of roughness of surfaces are marked on a contour lines, extension lines, or on
the shelves of line-foot-notes; when there is no space, it is allowed to write them on dimension
lines.
If all surfaces, indicated on the drawing, have an identical roughness, its denotations are
marked in the upper-right-hand corner of drawing, and no signs are put on the depiction. Sizes of
this sign must be approximately 1,5 times more than on a drawing (fig.6.4, a).
Figure 6.4 – Sizes of this roughness sign
If the roughness of surfaces on the drawing is not identical, in upper-right-hand corner, after
general denotation of identical roughness (for most surfaces), the sign of less size is put in brackets
(fig.6.4, b). It means that all surfaces which have no signs of roughness on the depictions must have
roughness, indicated in the upper-right-hand corner.
6.4 MAKING THE DETAIL DRAWINGS OF PARTS FROM SKETCHES
Unlike sketches the detail drawings of parts are done in a scale with the exact observance of
sizes with the help of drawings instruments.
To make the detail drawings it is necessary:
to analyze preliminary the sketch of a part, in accordance with State Standard 2.302-
68 choose the scale of a view and a drawing format ;
to draw a frame and title block on a format;
78

